
This blog describes how I setup this WordPress site locally. No hosting provider, no support, just a laptop that runs 24×7, what could go wrong?
If you doubt the idea but still want to know how, continue reading!

I know the photo has absolutely nothing to do with hosting WordPress locally, well actually, it could be relevant. We’ll get there.
Software Architecture
This is the opposite of what actually happened for me to get to this point. It took a little bit of exploring and experimenting to get to this setup and look, I am still learning, you probably are too since you ended up here, so it is almost certain that there are better ways of doing this. But this works and I find it pretty cool.
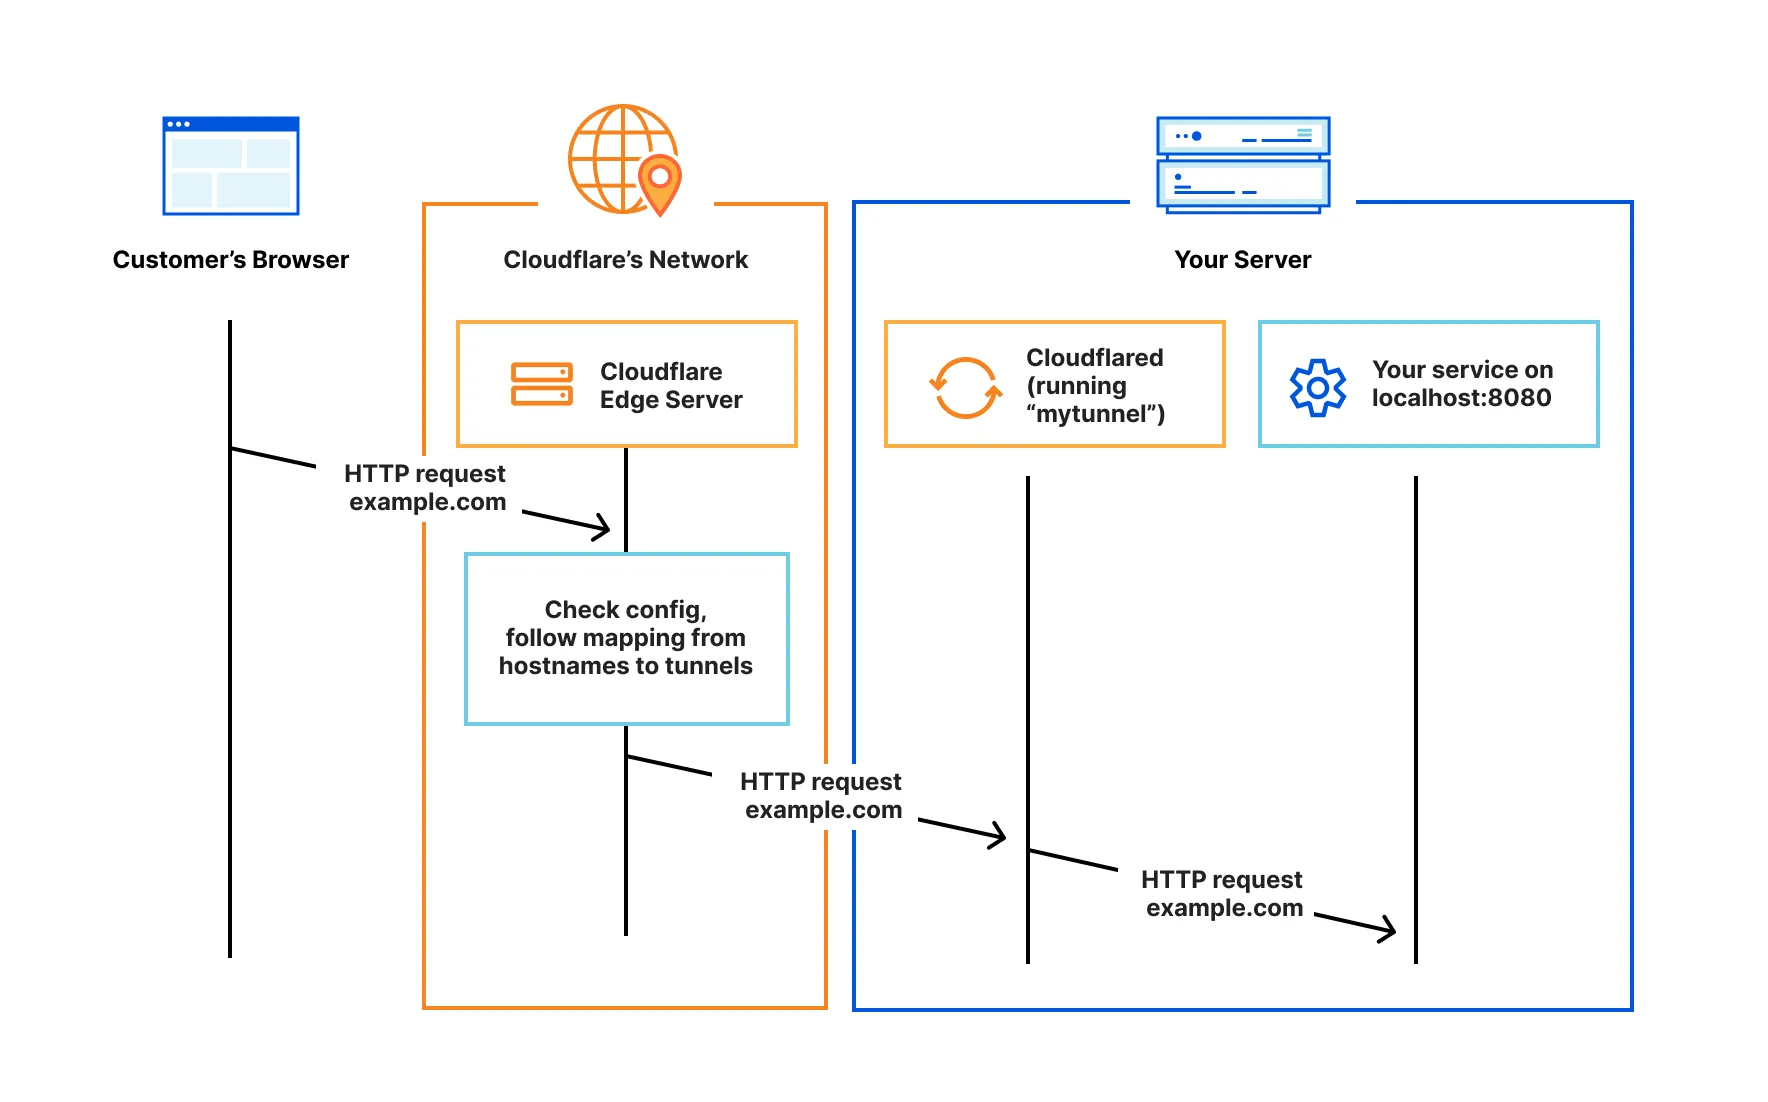
{Add overview image here}
Above is the setup, it consists of a couple of key components:
- LocalWP
- Cloudflare Tunnel
- Cloudflared service
- Domain (optional, but recommended)
If you have no idea what any of the above is, except maybe for domain, don’t worry! I was there and look where we are now. Let’s start at the beginning:
1. LocalWP
LocalWP (Local WordPress, but I think you knew that) is where it all starts. This is free software that you can use to setup and host a WordPress site on you own computer.
An effortless way to develop WordPress sites locally.
LocalWP takes care of all the most difficult things involved in hosting your own WordPress site, for example:
- The Web Server
- The Database
- PHP (Website language)
- Basic configuration
After setting up WordPress in about 5 minutes you have a working website running locally. But now the problem is that this can only be accessed by you, from your own computer, not very helpful for the purpose of this blog.
Check out this blog post to go through the installation and setup process. Although LocalWP does almost all of the hard lifting, there are some extra steps needed to make this whole setup work.
#2 How to set op LocalWP to host WordPress locally
I almost forgot, the link to LocalWP! Here you go:
2. Cloudflare tunnel
This is where the fun actually starts. The Cloudflare tunnel is where the magic happens, where your locally hosted WordPress site is exposed to the world! That’s the difference, with only LocalWP only you can access your site, but when utilizing the Cloudflare tunnel service everyone can.
Before doing anything you should create a Cloudflare account, don’t worry, it’s free.
The Cloudflare tunnel is part of the Cloudflare Zero Trust offering. In the documentation they describe it like this:
Cloudflare Zero Trust is part of Cloudflare One, our name for the Secure Access Service Edge (SASE) platform that protects enterprise applications, users, devices, and networks.
I would lie if I said I know what the above actually means, especially the first part. The second part, protecting applications, users, devices and networks sounds promising.
Check out this blog to follow along on how to setup your Cloudflare tunnel (It also includes the next section, setting up the cloudflared service).
{Cloudflare tunnel setup blog coming soon, don’t miss it!}
3. Cloudflared service
The cloudflared service is a piece of software (free!) that is required to make the Cloudflare tunnel work. This service makes a secure connection to your Cloudflare tunnel, opening only an outbound port on your firewall.
Think of it this way, it’s like you picking up your order instead of having it delivered, that means that the delivery man does not know where you live or how to get there. Actually I am not sure if that comparison is 100% correct, but in my head it makes sense.
The best place to learn more about how this works exactly is the official documentation, here is a short excerpt:
4. Domain (Optional, but recommended)
This is the only part of this whole setup where money might be involved. If you decide to get a domain.
A domain is like the alias for your entire website. Actually, not only your website but is useful for many other things like online storage, CDN (Content Delivery Network) etc.
Because domains are unique and require there to be server somewhere in the world that knows your domain should link to your website, it costs some money. But, it is much more affordable than you might think! Go here to check out prices and availability for Cloudflare domains.
Your domain can then be linked to your Cloudflare tunnel, which uses the cloudflared service running on your computer to connect to the WordPress site hosted by LocalWP. Wow, that’s a lot! But hopefully it makes sense.
Cloudflare does actually allow you to test this entire setup without having a domain using but then you would end up with a public URL like this:
https://{randomname}.trycloudflare.com
Instead of for example www.mfasoftware.net.
The public URL is what other people need to type into their browser to reach your website.
Conclusion
Hopefully everything that you just read makes sense. If you just skipped to this section, here is an overview of how to set this up:
| Topic | Short Description |
| LocalWP | Software used to locally configure and host a WordPress site. |
| Cloudflared | Service running on your computer to securely connect to your Cloudflare tunnel. |
| Cloudflare tunnel | The component that exposes your locally hosted WordPress server to the internet. |
| Domain | The link used to get to your website. |
{Transferring a domain from Bluehost to Cloudflare, coming soon!}
Please feel free to leave a comment down below if you have any questions! Let’s talk.
Leave a Reply